Router Sled: 10 Best Tips for Flat, Smooth Slabs (Proven Guide)
A router sled is one of the smartest tools a woodworker can build or buy. If you have ever brought home a beautiful live-edge slab only to discover it is too wide for your planer, a router sled is the simple, affordable fix. It holds your router above the wood and lets you shave the surface flat, one pass at a time, without a giant machine.
In this guide, a router sled means the woodworking jig used to flatten slabs and wide boards, not a snow sled. If you are looking for a winter hauling sled instead, see our guide to the jet sled.
This article explains what a router sled is, how it works, whether to buy or build one, and ten of the best tips for getting a flat, smooth surface. You will also find step-by-step instructions, safety rules, a shopping checklist, and answers to common questions about the router sled.
What Is a Router Sled?
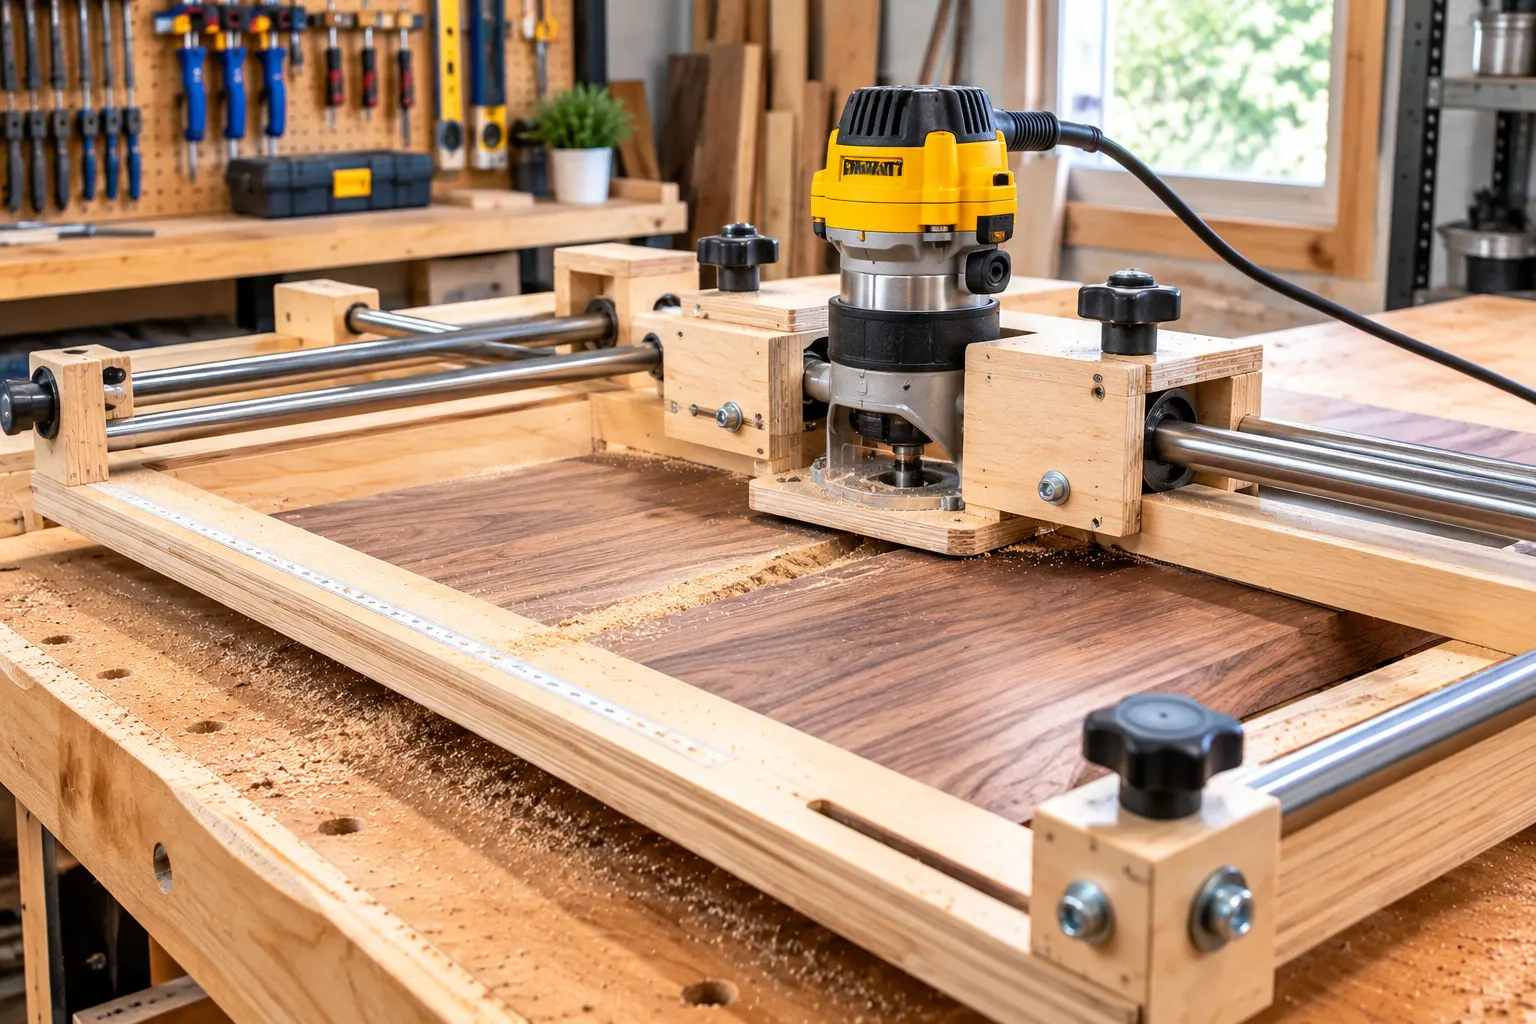
A router sled is a jig that guides a router across a workpiece in a flat plane. It has two main parts: a base or cradle with rails on both sides, and a carriage, or sled, that rides on those rails and holds the router. As the carriage moves back and forth, the bit protrudes through an opening and removes high spots from the wood below.
Many woodworkers also call it a slab flattening mill or a router planing jig. Whatever the name, the idea is the same. The rails set the cutting plane, so the router follows a flat path even when the slab itself is warped, cupped, or twisted.
How a Router Sled Works
The rails sit higher than the slab, and the carriage spans the gap between them. A large-diameter bit sticks out through a hole in the carriage base. You lower the bit until it just touches the highest spot on the slab, then slide the carriage across and along the wood, making repeated passes. Each pass removes a little more material until the whole surface is flat.
Because the router moves in straight, parallel lines, the finished surface is level with the rails. That is why the rails and the foundation under them matter so much.
Router Sled vs. Planer, Drum Sander, and CNC
A thickness planer is fast, but it is limited by width, and it cannot flatten a badly cupped slab without a flattening sled of its own. A drum sander can smooth a wide board, but it removes material slowly. A CNC machine can do the job with great precision, but it costs far more and takes up much more space. A router sled sits in the middle: it handles slabs of nearly any size, costs relatively little, and works in a small shop or garage. The trade-off is that it is slower than a planer and very dusty.
Why Use a Router Sled?
There are several good reasons to add a router sled to your shop.
- It flattens wide slabs. Live-edge slabs for tables, benches, and countertops are often wider than a planer can handle.
- It works on irregular shapes. Cutting boards, end-grain blocks, and resin pieces can all be flattened.
- It saves money. A homemade router sled can be built from plywood and a router you may already own.
- It scales to your project. You can build the rails as long and as wide as your slab requires.
- It gives you control. You choose how deep to cut and how many passes to make.
Router Sled Parts and Materials
Every router sled has the same basic components, whether you buy it or build it.
The Base or Cradle
The base holds the slab in a stable position. It must be flat, rigid, and strong enough to support the slab’s weight. Many builders use MDF or plywood on top of a sturdy bench, and some set the slab right on a pair of leveled sawhorses or a long table.
The Rails
The rails run along the sides of the base and carry the carriage. They must be straight, parallel, and exactly the same height. Even a small difference can tilt the router and leave a sloped surface. Metal rails are smoother and more precise, while wooden rails are cheaper and easier to make.
The Carriage
The carriage holds the router and slides along the rails. A popular homemade design uses a half-sheet of three-quarter-inch plywood and a plunge router. Plywood about a quarter inch thick works well for the carriage base because the router bit has to pass through it, and a thicker base can make the bit stick out too little.
The Router and Bit
A plunge router is a common choice because it lets you lower the bit in controlled steps. You need a bit that sticks out far enough to reach the wood through the carriage base, so check the bit’s length before you build or buy.
Choosing the Right Router Bit for a Router Sled
You can use a standard double-flute straight bit, which is usually affordable at about $20 to $40. A spoilboard surfacing bit or a dedicated slab flattening bit costs more, often about $60 to $100, but it can leave a cleaner finish. A wider bit removes material faster, so many woodworkers prefer large-diameter bits when their router and sled can handle them. Rockler’s full-size jig, for example, lists a maximum recommended bit diameter of 2-1/2 inches and a 1/2-inch shank. Prices and specs change, so always check the current details.
Buy or Build a Router Sled?
Both options can work well. The right choice depends on your budget, skills, and the size of the slabs you plan to flatten.
Store-Bought Router Sled Options and Prices
Several companies sell ready-made systems. At the time of this research, Rockler listed its full-size slab flattening jig at about $630, with a capacity of up to 28-1/2 inches wide, 78-1/2 inches long, and 2-3/4 inches thick. Rockler also listed a smaller benchtop jig for smaller slabs and cutting boards at about $200. Crafted Elements sells router sled kits in many sizes with prices listed from about $445 up to about $620, depending on the dimensions. Prices and availability change often, so confirm everything on the maker’s page before you buy. You can see the details on the official Rockler full-size slab flattening jig page.
Building Your Own Router Sled
A DIY router sled is a great weekend project. One popular design uses a half-sheet of three-quarter-inch plywood and a plunge router, and the builder says you can make all the cuts on a table saw and finish in about half a day. Some woodworkers later upgrade to aluminum rails and bearing collars to make the carriage glide more smoothly, and one woodworker reported doing that for under about $175. A homemade router sled is not limited by length, width, or slab thickness, which is a big advantage.
How to Build a Router Sled: Step-by-Step
Every design is a little different, so use this as a general guide and adjust it for your router and your slabs.
- Plan your size. Measure your largest slab, and add room for the rails. A good rule of thumb is to make the carriage about twice as long as the width of your bench so it cannot fall off the rails.
- Cut the rail parts. Make four straight pieces for the sides, and make sure all of them are cut to the same height. In one popular design, the inner rails are slightly thinner than the outer rails so the carriage can ride smoothly.
- Assemble the rails. Fasten the parts with screws rather than glue, and keep everything straight and square. Breaking the edges lightly can help the carriage slide.
- Build the foundation. Set up a flat, level base or bench. The rails must sit on a flat, even surface, or the cut will not be flat.
- Make the carriage base. Cut a thin plywood base, and lay out the opening for your router bit. Mark the outer diameter of the bit and cut a channel or hole large enough for it to pass through.
- Build the carriage frame. Add side pieces and end pieces so the carriage rides on the rails without wobbling.
- Mount the router. Drill and countersink holes for the router mounting screws. Make sure the screws do not stick out where they could touch the wood.
- Add stops. Screws or small blocks that stop the carriage from moving sideways can keep the bit from cutting into the rails.
- Test fit. Place the carriage on the rails and slide it around without the router running. It should move smoothly across the whole surface.
10 Best Tips for Using a Router Sled
1. Start with a Flat, Rigid Foundation
A router sled can only be as flat as the surface that supports its rails. Use a sturdy bench or a pair of leveled supports, and check them with a straightedge. A solid foundation makes every pass more accurate.
2. Keep Both Rails the Same Height
Rails that are even a little different can tilt the router and leave a slope. Measure them carefully, and keep them parallel. This is one of the most important details in any router sled build.
3. Support and Secure the Slab
A slab can rock, twist, or shift under the router. Use wedges, shims, and clamps or screws from below so it sits solid and level. A slab that moves during a cut is both a safety risk and a quality problem.
4. Check for Metal Before You Cut
Nails, screws, and old hardware can destroy a router bit and cause dangerous kickback. Inspect the slab carefully, and consider using a metal detector, especially on reclaimed wood.
5. Set a Shallow Depth
Lower the bit until it barely touches the highest point of the slab, then take light passes. Cutting too deep puts extra strain on the router and the bit, and it leaves a rougher surface. Patience gives better results.
6. Cut Across the Grain
Making passes across the width of the slab, rather than along it, is a common approach. It works well with a large-diameter bit and keeps the carriage moving in smooth, repeatable lines.
7. Use the Right Bit and Speed
Make sure your router is set to the correct speed for the bit you are using, since large-diameter bits usually need slower speeds. A sharp, high-quality bit makes cleaner cuts, so replace dull ones.
8. Overlap Your Passes
Overlap each pass slightly so you do not leave ridges between them. Move the carriage steadily, and avoid stopping with the bit spinning on the wood.
9. Control the Dust
A router sled throws a lot of chips and fine dust. Use dust collection, a shop vacuum, or a dust boot if your system has one, and wear a respirator. Clean up often so chips do not build up under the carriage.
10. Sand Away the Scallops
The process often leaves a slightly scalloped surface from the bit. Sanding with a random orbit sander or a hand plane smooths those lines and prepares the slab for finishing. Flatten the second side after flipping the slab, and use your first flat face as the reference.
How to Flatten a Slab with a Router Sled: Step-by-Step
- Prepare the slab. Remove loose bark, dirt, and debris. Check for metal and fill large voids if needed.
- Set the slab in place. Wedge and secure it so it does not move.
- Install the rails. Place them on a flat base, and check that they are parallel and level.
- Mount the router. Install your bit and set it to the correct speed.
- Set the depth. Lower the bit so it just touches the highest spot on the slab.
- Make the first pass. Start the router with the bit clear of the wood, then slide the carriage across the slab.
- Repeat in passes. Work along the whole surface, overlapping each pass.
- Lower the bit and continue. Take small bites until the whole top is flat.
- Flip and repeat. Flatten the second face, and check the thickness.
- Sand and finish. Smooth the scallops, then apply your chosen finish.
Router Sled Safety Tips
A router sled is simple, but routers are powerful tools, and slabs are heavy. Always put safety first.
Wear Protective Gear
Wear safety glasses, hearing protection, and a respirator or dust mask rated for fine wood dust. A face shield can add protection from flying chips.
Secure the Work and the Sled
Make sure the slab cannot move and the carriage cannot fall off the rails. Use stops, and check that screws are tight before every session.
Handle the Router Carefully
Unplug the router before you change bits or adjust the depth. Keep your hands clear of the bit, and let it come to full speed before it touches the wood. Follow the router and bit manufacturer’s instructions.
Lift Safely
Slabs can be very heavy. Use a helper, a cart, or a hoist when you move them, and lift with your legs to protect your back.
Watch the Dust
Wood dust can irritate your lungs, and fine dust can be a fire hazard. Use dust collection, ventilate the space, and clean up regularly.
Common Router Sled Mistakes
Even experienced woodworkers make these errors.
- Uneven rails: The cut ends up sloped.
- Weak foundation: The base flexes, and the surface is not flat.
- Cutting too deep: The bit chatters, the router strains, and the finish suffers.
- Skipping the metal check: A hidden nail can ruin a bit.
- Poor slab support: The slab rocks, so the cut is uneven.
- No dust control: Dust builds up, and visibility drops.
Router Sled Maintenance and Storage
A good router sled can last for years with simple care.
- Clean the rails: Wipe off dust and chips so the carriage glides smoothly.
- Check for wear: Look for worn rails, loose screws, and damaged guides.
- Keep it flat: Store wooden parts flat and dry so they do not warp.
- Inspect your bits: Replace dull or damaged bits right away.
- Lubricate metal parts: If your router sled uses metal rails or bearings, follow the maker’s care advice.
Router Sled Alternatives
If a router sled is not right for your project, there are other options.
- Hand planes: Great for small jobs and finishing, but slow for big slabs.
- Drum sanders and wide-belt sanders: Good for smoothing, though they remove material slowly or cost more.
- Planer sleds: These let you flatten a board in a thickness planer, but only within the planer’s width.
- CNC machines: Very precise, but expensive and large.
- Professional flattening services: Many shops will flatten a slab for a fee, which can be a good choice for a one-time project.
What to Wear and Bring for a Router Sled Workday
Comfort and safety matter when you spend hours in the shop. Wear closed-toe, supportive footwear with good grip, since sawdust, chips, and heavy slabs make for a slippery, risky floor. If you are shopping for new boots, our guide on how to choose hiking boots explains fit and traction, which also help on a hard shop floor. Dress in snug clothing, tie back long hair, and avoid loose sleeves and jewelry that could catch on the router.
A Sample Router Sled Project Plan
Here is an easy plan for a weekend slab project.
Saturday morning: Build or assemble the router sled. Set up the rails on a flat bench, and check that everything is level.
Saturday afternoon: Prepare the slab, check for metal, and secure it. Flatten the first side with light, overlapping passes.
Sunday morning: Flip the slab, and flatten the second side. Check the thickness and sand away the scallops.
Sunday afternoon: Clean up, inspect your bit, and start finishing the slab.
Router Sled Shopping Checklist
- Router, preferably a plunge router, with a collet that matches your bit
- Large-diameter surfacing or flattening bit, plus a spare
- Plywood or MDF for the base and carriage, or a ready-made kit
- Straight lumber or metal rails
- Screws, bolts, and T-nuts
- Wedges, shims, and clamps for the slab
- Straightedge and level
- Metal detector for reclaimed wood
- Dust collection or a shop vacuum
- Safety glasses, hearing protection, and a respirator
- Random orbit sander and sandpaper
Frequently Asked Questions About Router Sled
What is a router sled used for?
A router sled is used to flatten slabs, wide boards, and irregular shapes that do not fit in a thickness planer. It lets you create a flat face with a router and a guided carriage.
What router bit should I use with a router sled?
A large-diameter bit works best. Many woodworkers use a double-flute straight bit for a budget option, or a spoilboard surfacing or slab flattening bit for cleaner results. Check your router’s limits and the maker’s recommendations before you choose.
How much does a router sled cost?
Costs vary widely. A homemade router sled can cost much less than a store-bought one, while ready-made systems can run from a couple hundred dollars to several hundred dollars or more. Prices change, so always check current listings.
Can I use a router sled on a small project?
Yes. A router sled works well for cutting boards, end-grain blocks, and resin pieces, and smaller benchtop versions are made for exactly those jobs.
How do I get a smooth finish after using a router sled?
Take light passes, use a sharp bit, and overlap your cuts. Then sand away the scalloped lines with a random orbit sander or a hand plane before you apply a finish.
Final Thoughts
A router sled is a practical, affordable way to turn a rough, warped slab into a flat, usable work surface. Whether you buy a ready-made jig or build your own, focus on a solid foundation, matched rails, a secure slab, and light, steady passes. Add good dust control and safety gear, and your router sled will give you smooth results for many projects. For more outdoor guides, gear ideas, and seasonal tips, browse our hiking trails blog.